HTTPS is HTTP over TLS. It allows you to encrypt traffic to and from your web server, providing privacy and security for your clients. As of this writing, the world is moving ever closer to HTTPS everywhere: thanks to the Snowden documents, there’s been a big push for more privacy and security. Major companies like Google and Mozilla are securing traffic by default for all their applications. Cloudflare is offering free HTTPS encryption between clients and their severs. Let’sEncrypt, a new Certificate Authority offering free, secure certificates is scheduled to open it’s doors in September.
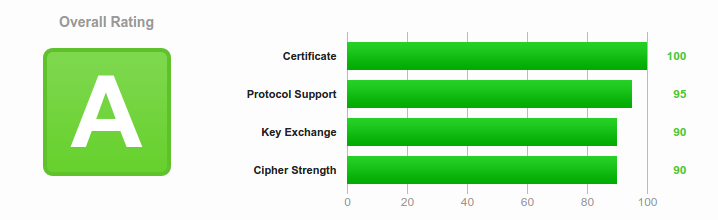
If you run a webserver, you should be offering HTTPS, and perhaps even forcing HTTPS-only traffic. This article is about how to configure Apache for HTTPS authentication, supporting modern cipher suites and TLS protocols. The goal is an “A” rating by the SSLLabs test
Note: These are recommended HTTPS configurations as of June 2015. If you’re reading this more than six months later, it’s almost certainly out of date.
There are four categories to the SSLLabs test: Certificate, Protocol Support, Key Exchange, Cipher Strength. We’ll cover best practices for each in order.
Certificate
Most of the certificate configuration information is relatively well known. I’ve included it for completeness if you want or need to read it in Appendix 3: General Certificate Information.
One of the more usual stumbling block for the Certificate section is the certificate chain, so I’ll keep this up here:
Have a complete certificate chain
This can be a tricky part for people new to HTTPS. Due to the nature of certificates, each Certificate Authority (CA) is verified as trusted by their own CA. This forms a trust chain from the Root CA certificate, down through each intermediate CA certificate, to your own certificate. If this chain is broken, your browser cannot verify whether or not your certificate is trusted. Fortunately, most of the Root and many of the intermediate Certificate Authorities’ certificates are usually included in the CA Bundle for your server by default. Sometimes, however, you may need to add your CA’s intermediate certificate to the chain to complete it. You can do this by copying the intermediate certificate to your server (your CA can provide it to you), and using the Apache “SSLCACertificateFile” directive:
SSLCACertificateFile /path/to/the/intermediate/cert
This can be added to your SSL configuration file (/etc/httpd/conf.d/ssl.conf on Red Hat-based systems), or individual Virtual Hosts if they have their own separate SSL configurations.
Protocol Support
Protocol Support is relatively straightforward. Each TLS Protocol describes how the cryptographic algorithms are used between the client and the server. As time has gone by, some of these protocols have been found to be insecure, so in order to protect your data in transit, and also receive a good score on the SSLLabs test, you must enable the “good” protocols and disable the insecure ones.
To do this with Apache, use the “SSLProtocol” directive, and add it to your SSL configuration file:
SSLProtocol +TLSv1 +TLSv1.1 +TLSv1.2 -SSLv2 -SSLv3
This enables TLS versions 1.0, 1.1 and 1.2, and disables the known-insecure SSLv2 and SSLv3 protocols.
Note: It’s possible to get a higher score on the SSLLabs test, and remove the slightly less secure TLS 1.0 protocol by changing +TLSv1 to -TLSv1. However, as of June 2015, about 30% of browsers out there still support only TLS 1.0, namely Android < 4.4, and IE < 11. This means users with those browsers will be unable to connect to your server if you disable TLS 1.0. Hopefully the use of those older browsers will be reduced quickly.
Key Exchange
The best way to get a good score for the Key Exchange category and add security to your HTTPS connection is to use a key with a length of at least 4096 bits, not allow anonymous key exchange and not use a weak (Debian OpenSSL flaw) key.
4096 Bit Key
This is easy. Generate your key with 4096 bits. If you’re doing it manually, with the OpenSSL command, you’d simply specify 4096 as the key length.
openssl genrsa -out <name for your key file> 4096
Disable Anonymous Key Exchange
Covered in the Cipher Strength below
No Weak Key (Debian OpenSSL flaw)
This is an older bug in Debian’s OpenSSL package. If you’re using a Debian-based system, update to the latest OpenSSL package before generating your key, and you’re good to go.
Cipher Strength
There are dozens of Ciphers supported by the OpenSSL packages. In order to secure your traffic, you should enable only the most secure ciphers available in your OpenSSL package. The easiest way to get a list of trusted ciphers is to follow Mozilla.org’s recommendations for the Modern Compatibility Cipher Suites
In order to configure Apache to use the recommended ciphers as of June 2015, modify the “SSLCipherSuite” directive in your SSL configuration as follows:
SSLCipherSuite
ECDHE-RSA-AES128-GCM-SHA256:ECDHE-ECDSA-AES128-GCM-SHA256:ECDHE-RSA-AES256-GCM-SHA384:ECDHE-ECDSA-AES256-GCM-SHA384:DHE-RSA-AES128-GCM-SHA256:DHE-DSS-AES128-GCM-SHA256:kEDH+AESGCM:ECDHE-RSA-AES128-SHA256:ECDHE-ECDSA-AES128-SHA256:ECDHE-RSA-AES128-SHA:ECDHE-ECDSA-AES128-SHA:ECDHE-RSA-AES256-SHA384:ECDHE-ECDSA-AES256-SHA384:ECDHE-RSA-AES256-SHA:ECDHE-ECDSA-AES256-SHA:DHE-RSA-AES128-SHA256:DHE-RSA-AES128-SHA:DHE-DSS-AES128-SHA256:DHE-RSA-AES256-SHA256:DHE-DSS-AES256-SHA:DHE-RSA-AES256-SHA:!aNULL:!eNULL:!EXPORT:!DES:!RC4:!3DES:!MD5:!PSK
This supports the majority of modern browsers. As with the SSLProtocol above, you can take it a step further and remove some of the less secure ciphers from this list to get a better score and better protect your traffic, but a larger portion of browsers will be unable to connect to your server. If you’ve already disabled TLS 1.0, then that may not be an issue for you.
Conclusion
This information covers the basic configurations for setting up an Apache server with HTTPS support, and making sure it’s acceptably secure. Using insecure HTTPS settings is effectively just as bad as using no HTTPS – maybe more so if you lull your clients into a false sense of security – so making sure you stay up-to-date with vulnerabilities is extremely important.
As mentioned previously, this is valid as of June 2015. The older this article gets, the more out of date these recommendations are. By 2016, you should probably verify the information here to make sure it’s accurate.
Appendix 1: Perfect Forward Secrecy
Another beneficial security, and one required for an “A” grade from SSLLabs, is Perfect Forward Secrecy (PFS). PFS is a protocol that protects data transmission in the event that one of the keys used is compromised in the future. (Check the “Further Reading” section for more specific details).
Until relatively recently, the version of OpenSSL shipped with some of the modern distributions of Linux did not support the ciphers required for PFS. The list of cipher suites in the Cipher Strength section includes ciphers that support PFS, but in order to make sure it’s used, you have to require that the cipher order is honored (ie: use the best first; lesser only if the client cannot interact with the best). To do that with Apache, set the SSLHonorCipherOrder directive in your SSL configuration file:
SSLHonorCipherOrder on
If your version of OpenSSL does not support the more secure ciphers, this will not break anything – they just will not be used. However, your server will not support Perfect Forward Secrecy either.
Appendix 2: Server Name Indication
Server Name Indication (SNI) is an extension of the TLS protocol that allows a client to send a request to the server that informs the server of the hostname the browser is attempting to connect to, without the server having to find a TLS key with which to decrypt the traffic first.
Before SNI, there was no way to differentiate what host the client was attempting to connect to before the TLS decryption occurred, so Apache could not tell which host to direct traffic to. This meant each HTTPS enabled site had to have it’s own IP address, so traffic was routed via IP instead.
Functionally, this allows Apache to host more than a single HTTPS enabled site per IP address.
If you are using SNI, it’s worth noting that SSLLabs does a check for “Incorrect SNI Alerts”. These alerts are sent by the server if an SNI-enabled server sends a certificate which contains Subject or Subject Alternative Names for which the server or or it’s virtual hosts are not configured.
For example: If your certificate included “www.example.org” and “example.org”, and was used with a Virtual Host with no ServerName or ServerAlias directives setup for “www.example.org” or “example.org”, this would trigger the “Incorrect SNI Alert”.
The same thing would happen if your host was configured with a ServerName for just one of the two Subject names included in the certificate.
Note: This is not the same thing as the certificate not matching the domain. That is a separate issue, and discussed in Appendix 3: General Certificate Information.
To fix Incorrect SNI Alerts, the Virtual Host or server responding to the SSL request MUST have the ServerName directive set for the primary Subject name, and ServerAlias directives for ALL of the other Subject Alternative Names in the certificate.
Appendix 3: General Certificate Information
The certificate section is probably the easiest to get setup correctly. To score well, you need to meet a couple of criteria. The certificate must:
Match the domain name of the site it’s used on
This simply means you must use a certificate that matches your domain name. A certificate for “example.org” does NOT match the “www.example.org” domain, and vice versa.
A certificate CAN have multiple subjects, through the use of Subject Alternative Names, so your cert can include both “example.org” and “www.example.org”, or more.
Not be expired, revoked, or not yet valid
This is easy. When you get a cert, it will be valid for a specific period of time. Chances are it won’t be valid starting in the future, so you’re OK there. As long as you replace it with a new one before it expires, and don’t use a certificate that’s been revoked, that should cover the rest.
Be signed by a trusted Certificate Authority
A trusted Certificate Authority is one that’s included in trust stores by general community consent. Your Certificate Authority derives it’s trust from it’s Certificate Authority, and on up the line. If you are unsure how to find a trusted Certificate Authority, use Let’sEncrypt – their certificates are also signed by IdenTRUST.
Use a secure certificate signature
Your Certificate Authority should sign your certificate with a secure signature (not MD2 or MD5, etc). If they do not, find another CA.